CS 291A, Assignment 3, Option a):
A Virtual Reality Portal
Due: Friday, Nov. 18th, 23:59:59
Change Log:
Oct. 31: original post
For this assignment, you will use the OpenCV face tracker from Assignment 2 to
implement head-tracked Virtual Reality. For a live demo of the concept (head
tracking implemented using Wii motes), see
the popular video by Johnny
Lee. Here is also a pointer to
his project (C-sharp code, which, however, follows quite a different
approach than we will take).
The outcome of this assignment will be a VR Portal. Running your application
should give you the ability to 'look into your computer screen' to view an
artificial 3D scene and experience the correct head motion parallax:
You will also adapt the interaction technology from HW 2 to highlight
different targets in your scene. In order to do all this, you will
- learn about and implement off-axis projection
- Provide feedback on the head tracking by either blending in or
displaying in a scaled-down window your camera view.
- Experiment some more with motion-based interaction to highlight one
target after the other in a controlled fashion.
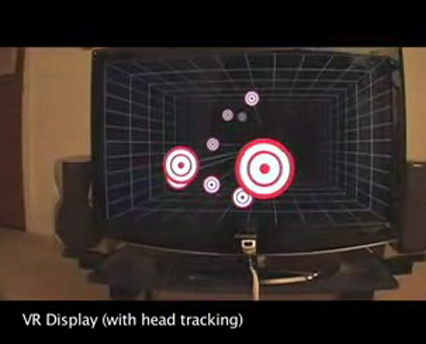
1. Creating 3D Room Geometry
The first step is to create the 3D scene geometry and display it using OpenGL.
Using the GL_LINE_LOOP and GL_LINES primitives and several iteration
loops, draw the wireframe grid outline giving the impression of a box extending
the display frame into the area behind it, as seen in the image above. In
regular distances, display 6 rectangles matching the size of your screen,
further and further translated away from the viewer. Also as seen above, draw
the 4 edges of the box and 9 parallel lines on each side of the box extending
away from the viewer. These lines should end at your distant-most rectangle.
The "Targets" are simple GL_QUADs that are texture-mapped
with a partially transparent texture. We'll post
hints to display the texture with correct transparency. Make the number of
targets an adjustable variable in your code (10 is a good default) and display
them at a different distance from the viewer each (half of them "in front of"
the screen, and the other half behind it - in the box tunnel). Assign the
x and y positions randomly. Connect each target with a line from the
vanishing point to the center of the quad. Bias the position of the targets "in
front of" the display so that they are closer to the center and stay in frame
even with larger head motions (assuming your world origin in the center of the
screen, simply multiply the 'front' targets' x and y positions by 0.5).
2. Providing an overview of your camera feed
In order to give the user feedback about their head and hand positions as seen
by the camera, show the camera image. We want you to implement two ways of doing
that:
- Blend the OpenGL scene with your camera image, adjustable on
key-press.
- Display a 320x240 pixel version of your camera feed as a
live-textured polygon in the bottom right corner of the screen, always on
top and not affected by head tracking (HUD)
3. Implementing Head-Tracked Off-axis Projection
Building on the head-tracking from Assignment 2, infer a head position
relative to the OpenGL world coordinates outlined in Step 1 above.
Unlike in Assignment 2, you will need to represent your
display screen in world coordinates. This requires a calibration step. Whereas
in HW2, your physical camera was deemed the origin of the scene, you should make
the center of your display screen the world coordinate origin this time. You
need to physically measure the size of your screen and express the screen
corners in the newly defined world coordinate system. You also need to measure
the distance of your camera to the new origin, and make sure that the camera (if
it's a clip-on webcam) stays static. Make sure that all measurements are done in
the same unit that you also use for your OpenGL calculations (e.g. cm). With
your code from Assignment2, you will measure the head position relative to the
camera position, so you need to convert those to your new world-coordinate
system (a simple translation). Then you need
to adjust the perspective projection on a frame-by-frame basis. You cannot use gluPerspective for this, since your screen does not stay orthogonal to your
viewing direction. Instead, you need to implement what is known as Off-Axis
Projection. This description gives you all the
necessary details.
4. Interaction by Gesture Recognition
Finally, we want you to interact with the scene that you are viewing by making
it possible to select any of the target objects. At the very least, we want you
to implement selection by cycling through the targets using the "button-style"
interaction from Assignment 2. For up to 5% extra credit, we want you to
experiment with and implement more direct interaction (at least for the larger
front targets). The blending mode from Step 2 above for example makes it
possible to wave right over the target to select it. This will likely not work
reliably for small targets in the background, but should be quite effective for
the larger foreground targets.